
This week the quick bend tool got some polish and is working quiet good. One thing that I noticed is that I found it difficult to found information about the buttons in the HDA. So at the end of the post you can found more about buttons in Houdini. Later this week I created a FFD node for Houdini.
Quick bend
Polished the quick bend node and here is the result. Materials are from Substance Source.
Gif is an example of a model that was made in minutes with the quick bend.

Some of you have asked on Twitter to know more about it and here is a breakdown of the mean idea. By using the bounding boxes (bbox) in the standard bend sop of Houdini, you can already do a lot.
In the image below you can see that the bounding boxes are used to automatically get the origin for an object to bend. These setting here are specific for bending around the X-axis. To make sure that the Capture Origin is in the middle I add Y and Z size. By adding this the origin of bending will be in the middle (look at the handler in the viewport).
Bounding boxes are very useful and can automatically do things for you.

You can make a HDA from this like me and start adding more feature on top of it. What you also can do is save preset on the bend node itself. Save preset are handy to use. Every time you need to bend an object you go in the presets and select the one you need.
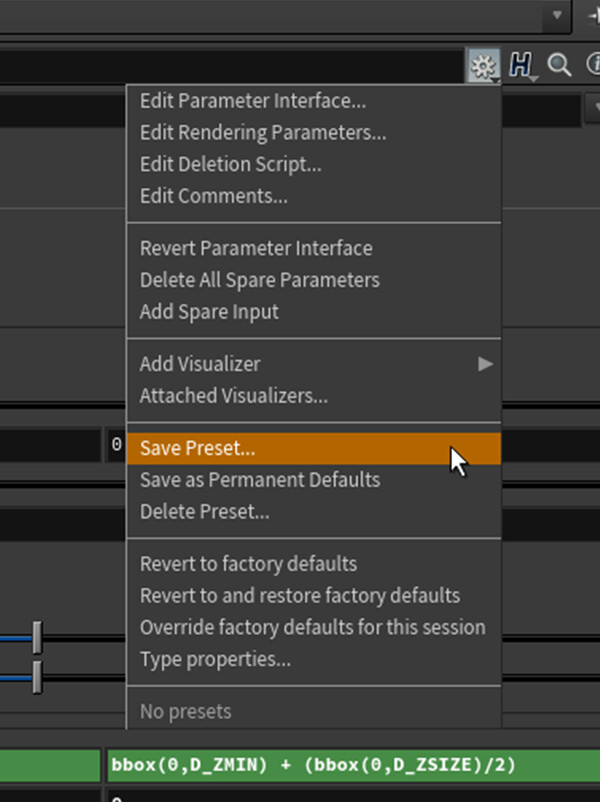
Another example of presets that I use is in the transform node to automatically place a model on the grid so the pivots are correct.
FFD/Lattice deformer
Next is a FFD node, some of you that gave used 3Ds max know this feature (I was once a 3DS max user, but switched to Houdini :) ). It is a box around your model, by moving the vertices of this box your model will be deformed. Here is the result of it and see for yourself what it does.
Press the edit button and a box shows up that allows you to deform the model.

It took me some time to figure it out. After a few hours of trying, I was not really happy with the result. Then decided to make research and found a really good video on this. Here is the link ( https://vimeo.com/210121561 ) It will be shown in a vop network. After following the video I made it in a wrangle. I was very close with my own system, the one thing that I didn’t think of was the pcfilter (can be used with point clouds). Pcfilter can calculate the average information of a point cloud. So you can ask to the pcfilter the average normal information. (This was also mention in the Joy of VEX that I followed, Day 20).
Other software is using the name lattice for deforms like this. When trying out the Lattice of Houdini, I felt I could improve on it. By making the box around the model automatically.
What I wanted for the tool is that you only need to plugin the model and it automatically creates bounds.
In the picture you see first the setup with Lattice. And under it the custom FFD and how it looks inside the HDA.

Inside these wrangle there are 2 lines of code in each of them. The first wrangle calculates the difference between original bounds and the edited bounds. So if you didn’t change the points position it will be 0. But when you move a point it will get a value. We save this information in the normal, with this you can also easy see the result if you enable normal in viewport.
@N = -(@P – pos2) ;
The next wrangle will move the points based on the normal information that we just added. But first creating the point cloud. The point cloud used the second input (bounds look at the picture) for creating the point clouds around it. With this we select all the points that will be influence on your custom model. Then use the pcfilter to get the average normal information of the added normal and directly added to the position of the model.
The line looks like this
@P += pcfilter(pcloud, 'N'); //getting average normal and using it in the point pos
So points that have been moved, will have a normal value that is not 0. With result that the points will be moved.
Next challenge here is to make the edit sop editable will it is the HDA. That is why I made the next topic, Buttons in HDA. Because here is where the magic happens.
Button in HDA
Overall I could not found quickly information about buttons in Houdini and how to use it in a HDA. By default if you create a button not that much is happening.
After some searching I found that the useful part of the buttons are the Callback Script text box. In here you can type a piece of code that will be used when pressing the button.
The coding languages here are Hscript and Python. For some reason I found it easier to write it in Python, I don’t know why. But as long as it works :D
To set for example a float value you use this in the callback script
kwargs['node'].parm('bend').set((180));But you can also start calling a module that you make in Python. This is exactly what I did for the FFD, to make the edit node editable.
Calling python function :
hou.pwd().hdaModule().editIt(kwargs)
So editIt is a custom module created for this HDA. You can write the module in the HDA properties, go to the script tab and add a Python Module.
Here is part of it that was the most interesting.
edit = sopnode.node("Name node to edit")
edit.setCurrent(True, True)
viewer.enterCurrentNodeState()
As you can see we sort of force Houdini on the node that we want. We set it to current node to look at and we enter the node state in viewer. This gives us the result that we can edit the edit node in a HDA, when pressing the button.
https://www.sidefx.com/forum/topic/18863/ more info on how to make.

Thank you so much for taking a look at the blog, I promised my self to keep it more compact the blog put ended up show more.
Hopefully see you next time.
If you have any thoughts or feedback feel free to share it.