
New week, new blog :D. This week I followed tutorials of the new PDG system. I wish I had more time to explore the PDG but there is a presentation upcoming so I’m preparing that also. The event is called Everything procedural or EPC in short.
I will share some progress on the result that I have from the tutorials. You can find the tutorials on the Sidefx Vimeo channel.
What is PDG
For people who have not seen the Houdini 17.5 release video, they might have missed PDG. This was the big feature they introduced at the release. I can recommend you watching the video of Houdini 17.5 if you want to know more about Houdini.
PDG stands for procedural dependency graph. It can distributes takes with the help of the scheduler and computes them parallel. In other words we can generate multiple tasks at once (depends on your computers power). Like a city generator is often an example. With the system you can generate large cities and generate multiple buildings at once.
The big advantage here is that is we make changes to our city and only the parts that will have changed will be recalculated. Let say we have 500 buildings and 200 have been changed, then only the 200 buildings will be calculated. As with other systems you might need to fully recalculate the full city.
With this I hope you will have a better idea of what it can do, it is of course possible to do way more with it. An other example is using the system to make tons of variations, this can go from a variation on a model to having variations in destruction to see what works best.
PDG: Wedging
Let’s start very simple. Wedging is used to create variation and is interesting to use. With wedging we can create random values for each variation.

First of all you will need to create a TOP network (here is the PDG system). Once in the TOP network create the wedge node.
With the wedge count you can ask how many variations you want. To show the results you need to cook the nodes. By right clicking you can select cook or press shift+g. Now dots will show up and this will be equal to the wedge count. You can click on these dots to see it in the viewport (as this is an simple example it should work, like in the gif).
Next what you should do is go to the wedge attributes and create one. For the example here let’s just use a float and set the range you want. Notice that by default random sample is off. With random samples off you will get with each variation the same value added linked to your range value. If your wedge count is 10 and range is set to 0 – 1. What will happen is that each count, 0.1 will be added. So if you want random numbers enable random samples. You can check the value by double clicking on one of the PDG dots.

Give your wedge attribute a proper name and you are ready to go. What you will have to do now is go in the other network where we have a procedural model or setup. I will share this small graph for random damage. In the mountain node you type @wedge_attribute and now you have linked the PDG with the procedural asset.

PDG: Baking
Taking the same system you just made we can add automatic bakes on each variation. Here you already get a taste of the PDG system where it will bake all the normal maps for you. So if you just made 100 variations it can bake for each of them a normal map.
The PDG system will bake all the maps for you automatically.
For this we need a ROP fetch and a ROP network. (Rop stands for rendering operation) In the ROP network we can create a simple baker this should be in the game dev tools if you have installed them. In the ROP fetch, fill in the ROP path to the texture baker and then cook to see what you have.

Look also at the naming of the file and use @pdg_index to get the number of the current task.

If everything went good you will see your normal maps in the folder. To be honest it didn't work always I need to research a bit more on this as often the cook would fail or empty normal maps would show up.
PDG: Exporting
As last let's say you want to export all the variations.
Add a new ROP fetch and create a ROP FBX where your procedural system is. Then again fill in the path in ROP fetch to the ROP FBX. In the FBX node you can use the @pdg_index again to auto name them.
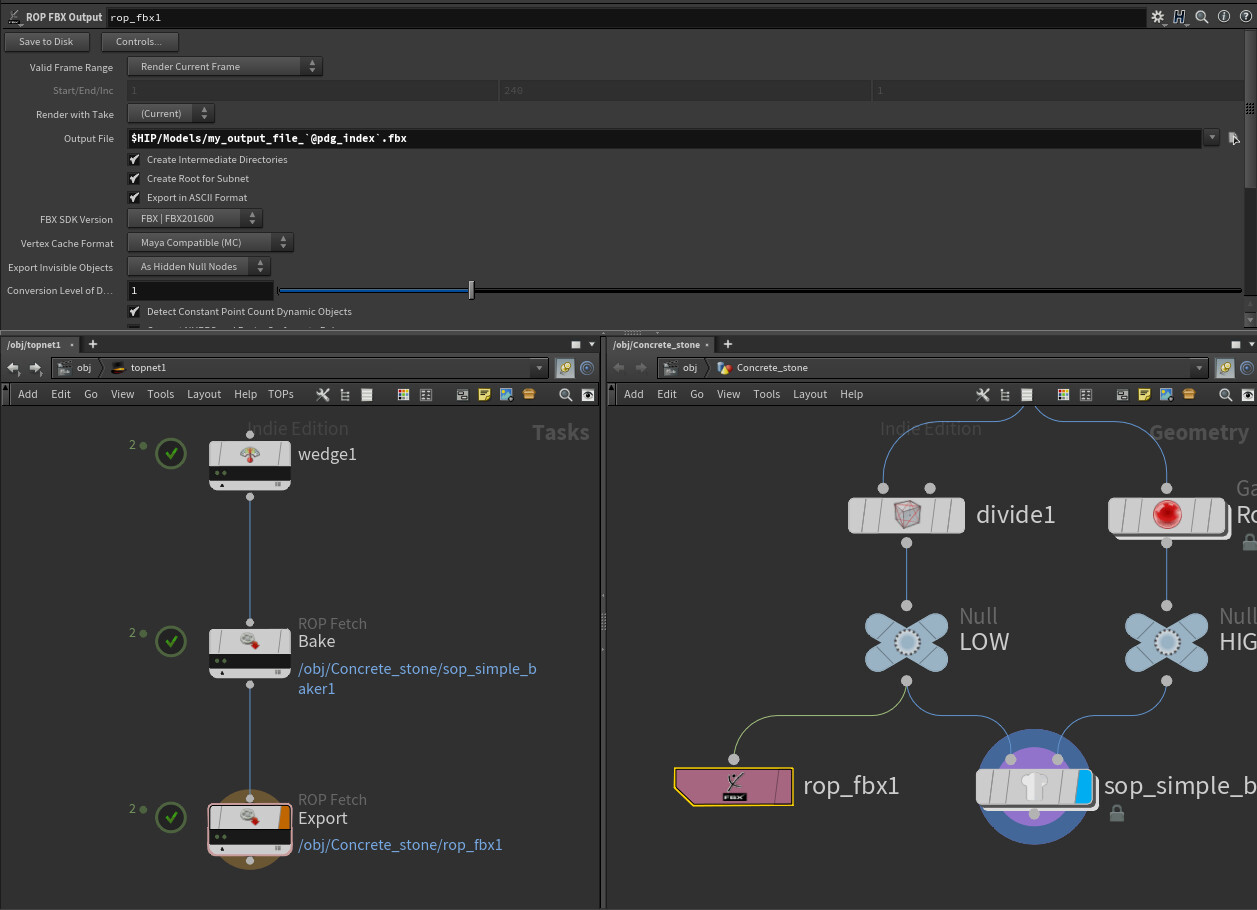
I had no problems exporting models. I hope you can see that this can be handy if you need to create a lot of variations of something. Like you can make a car generator and everything is baked and exported for you.
This was a small part of what PDG is. I have more things to show but I feel this is already quiet a lot for one post.
I hope you enjoyed this post, personally I found PDG interesting and see potential in it.
If there are any mistakes or things that I have missed let me know.
See you next time!